I found most of the developers having a common problem of adding a tag code, snippets, pixels or script tag to their websites by that they can track events, re marketing, conversions, analytics and more. Google Tag Manager (GTM) introduce to resolve developers or publishers this type of issue. Google Tag Manager (GTM) makes you possible to add or update tags without having help of your developer.
Google Tag Manager (GTM) provides a full control to their users over how your tags are defined and when should fire. GTM quite easy to learn and much simple to manage if you understand the basics and flow of using that. If you're an SEO and you are managing tracking codes of multiple clients then its good time to start with GTM without having any delay.
Google Tag Manager (GTM) provides a full control to their users over how your tags are defined and when should fire. GTM quite easy to learn and much simple to manage if you understand the basics and flow of using that. If you're an SEO and you are managing tracking codes of multiple clients then its good time to start with GTM without having any delay.
More in-depth GTM features
Google Tag Manager has a lot more advanced features and details, like layers and setting up administrators/users. You can find information on all Google Tag Manager features on Google Tag Manager’s help section.
Google Tag Manager (GTM) is large Topic, so here I am sharing the full article on basic of Google Tag Manager (GTM)
Start Learning with Google Tag Manager -
Follow below steps to start with GTM -
Step 1 : Login with GTM
To start using GTM, visit the Google Tag Manager login page. When you click login you will find below page
Step 2 : Setup Accounts for GTM
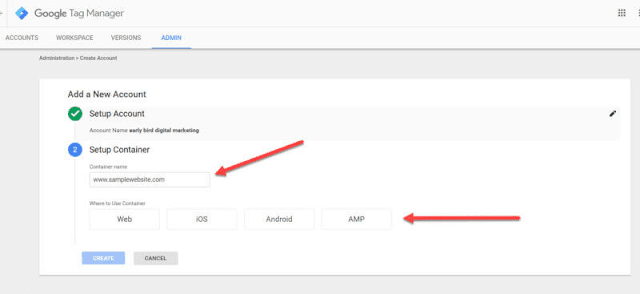
The first thing to do is give your account a name. You’ll want to name your account with the name of your company so that you can find and manage each of the sites you have in GTM. It’s generally recommended that you have one account per company and one container per site.
Once you have your account set up, you will create your first container. Give your container a name and indicate where you want to use the container: website, iOS, Android or AMP.
Click on create once you’ve chosen your container location, and agree to the Terms of Service, you are ready to install google tag manager.
Step 3 : Install Google Tag Manager Container
Next you will be given two pieces of script to put on your site as below:
The Google Tag Manager snippet code must be placed on every page of your website. Google cautions you not to put code in a hidden iframe and not to use another tag management system while using GTM (It can cause issues).
Once you’ve added your both GTM snippet code to your site, Google Tag Manager is ready to go.
Step 4 : Setting up triggers
Tags typically execute, or “fire,” when a web page loads or when some other user interaction occurs. In Google Tag Manager, you define triggers with tags to tell GTM when a tag should fire. A great example of a trigger is the “Page View” trigger, which can be used if you want to have your tag fire when a specific page loads.
You will want to tell GTM what to do when a certain action is taken by a user. Setting up triggers is easy to do — you just choose the trigger type:
Step 5 : Setting up variables
Variables help define triggers and what data they send. For instance, you could set up a variable when someone goes to a specific page or clicks on a checkout button or download page.
Step 6 : Previewing Workspace
Step 7 : Remember to publish
Once you have tested your changes to GTM, remember to publish your workspace. your changes will not work until you publish your workspace. So always do remember after added or edited tags, triggers and variables in a workspace, you have to publish:
With a little bit more learning and practicing, you’ll find that managing the tracking code you use will be much easier and more efficient thanks to Google Tag Manager.
little bit content source : outshine.com


Note: Only a member of this blog may post a comment.