Table of Contents
- Many developers struggle with adding tags, snippets, pixels, or scripts to their websites to track events, remarketing, conversions, analytics, and more. Google Tag Manager (GTM) was introduced to address this issue, enabling users to add or update tags without developer assistance. Google Tag Manager (GTM) provides full control over how tags are defined and when they fire. It’s easy to learn and manage once you understand the basics. If you're an SEO managing tracking codes for multiple clients, now is the perfect time to start using GTM.
- More In-Depth GTM Features
- Google Tag Manager (GTM) is a broad topic. Here, I’m sharing a guide on the basics of GTM.
- Start Learning with Google Tag Manager
Many developers struggle with adding tags, snippets, pixels, or scripts to their websites to track events, remarketing, conversions, analytics, and more.
Google Tag Manager (GTM)
was introduced to address this issue, enabling users to add or update tags without developer assistance.
Google Tag Manager (GTM) provides full control over how tags are defined and when they fire. It’s easy to learn and manage once you understand the basics. If you’re an SEO managing tracking codes for multiple clients, now is the perfect time to start using GTM.
More In-Depth GTM Features
Google Tag Manager offers advanced features like data layers and setting up administrators/users. Learn more about all GTM features on the Google Tag Manager Help Section.
Google Tag Manager (GTM) is a broad topic. Here, I’m sharing a guide on the basics of GTM.
Start Learning with Google Tag Manager
Follow these steps to get started with GTM:
Step 1: Log In to GTM
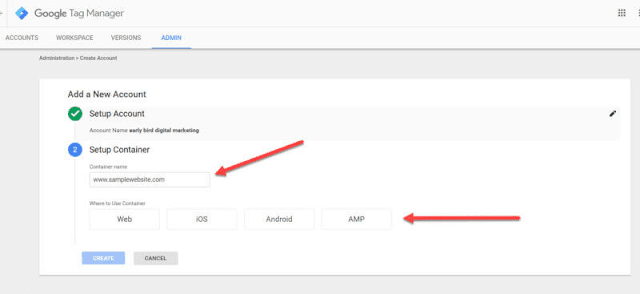
Step 2: Set Up Accounts for GTM
Name your account using your company name for easy management. It’s recommended to have one account per company and one container per site. After setting up your account, create your first container, naming it and selecting its type (website, iOS, Android, or AMP).


Click “Create” after choosing the container type and agree to the Terms of Service to proceed with installing Google Tag Manager.
Step 3: Install Google Tag Manager Container
You’ll receive two script snippets to add to your site:


The GTM snippet includes a `


