Magento Theme Development: Blocks and Layouts
Magento’s fully modular architecture offers unlimited scalability and flexibility for your eCommerce store. This modularity extends to theme development, requiring a unique approach compared to other platforms. This guide introduces Magento’s key theming concepts—Structural Blocks, Content Blocks, and Layouts—and provides a step-by-step process for building a custom theme.
Introducing Blocks and Layouts
If you’re familiar with other eCommerce platforms, you may have preconceived notions about theming. With Magento, you’ll need to adapt to its unique structure, but the learning curve is manageable. The core components are:
- Structural Blocks: These define the page’s visual structure (e.g., header, footer, left/right columns).
- Content Blocks: These contain the functional content (e.g., product lists, mini-cart, newsletter sign-up).
- Layouts: XML files that assign content blocks to structural blocks and control their positioning.
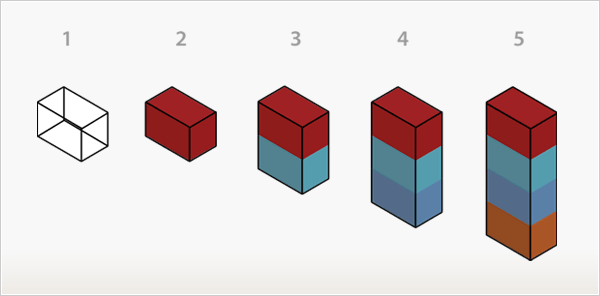
Understanding Blocks: A Mental Model
To grasp blocks and layouts, visualize the following:
- Picture an empty outline representing a structural block.
- Imagine adding one content block inside this outline.
- Add two, then three, then four content blocks, with the outline expanding to accommodate them.
This mental model mirrors Magento’s structure. Structural blocks (e.g., header, main content area) act as containers that position content blocks (e.g., product tags, category lists) within a page. The layout (XML files) dictates how these blocks are arranged and which templates they use to generate (X)HTML.

Snapshot of a Magento category landing page

Breakdown of the category page into structural and content blocks
Structural blocks form the page’s skeleton (e.g., header, left column), while content blocks provide the functional content (e.g., category lists, callouts). Layouts allow you to assign content blocks to structural blocks and modify page structure via XML. Learn more about layouts in Magento’s Intro to Layouts.
Unlike traditional platforms with monolithic template files (e.g., left_column.ext), Magento manages templates per functionality, allowing you to load/unload features using layout commands, reducing spaghetti code.
Step-by-Step Guide to Building a Magento Theme
Magento provides four key tools for theme development:
- Templates: (X)HTML files for rendering content blocks.
- Layouts: XML files controlling block placement.
- Blocks: Structural and content blocks defining page structure and functionality.
- Skins: CSS, images, and block-specific JavaScript.
Follow these steps to build your theme:
Step 1: Disable System Cache
To see real-time changes, disable the cache in the Magento Admin Panel:
- Navigate to http://yourhost.com/admin.
- Go to System → Cache Management.
- Select Disable from the “All Cache” dropdown and save.
Step 2: Define Page Structure Types
Plan the structure for each page type in your store. For example:
- Home page: Three-column structure.
- Category listing page: Two-column structure with a right column.
- Customer pages: Two-column structure with a left column.
Skeleton Templates
Create (X)HTML skeleton templates for each structure type and save them in app/design/frontend/your_interface/your_theme/template/page/. These templates contain minimal markup for positioning structural blocks, along with the <head> section. Use the <?php echo $this->getChildHtml('block_name'); ?> method to load structural blocks. For example:
<div class="header"><?php echo $this->getChildHtml('header'); ?></div>
Each getChildHtml call references a block name defined in the layout. Assign skeleton templates via the layout, as shown in Magento’s layout documentation.
Step 3: Create Templates for Content Blocks
Break your (X)HTML markup into templates based on functionality (e.g., mini-cart, product tags). Each content block gets its own template file, stored in app/design/frontend/your_interface/your_theme/template/. To identify existing templates:
- Go to System → Configuration in the Admin Panel.
- Select your store in the website/store selector.
- Under the Developer tab, enable Template Path Hints.
- Refresh the storefront to see template paths overlaid on each block.
Modify templates by following the paths provided (e.g., app/design/frontend/default/default/checkout/cart/sidebar.phtml for the mini-cart).
Step 4: Customize Layouts
Adjust block placement using layout XML files in app/design/frontend/your_interface/your_theme/layout/. Layout files are module-specific (e.g., checkout.xml for cart-related blocks). Use Template Path Hints to locate the relevant layout file by checking the module name in the template path.
Default Layout vs. Layout Updates
The default layout (page.xml) applies to most store pages. Layout updates (e.g., catalog.xml, customer.xml) modify specific pages. For example, to use a two-column layout for product pages instead of the default three-column layout:
<reference name="root">
    <action method="setTemplate"><template>page/2columns-right.phtml</template></action>
</reference>
To remove a newsletter block from customer pages, add an unset command in customer.xml:
<reference name="right">
    <action method="unsetChild"><name>newsletter</name></action>
</reference>
Learn more about layout handles in Magento’s layout documentation.