How to move your wordpress site from localhost to server?

Developing a WordPress website on a local server (localhost) is a common practice for building and customizing sites with ease and speed. Local development allows quick access to files and databases without internet costs. This guide outlines the manual process of moving a WordPress website from a local server to a live server, ensuring all content, themes, and plugins are transferred safely. While plugins can simplify this process, understanding the manual method is valuable.

You’ll need an FTP client and a text editor for this process.

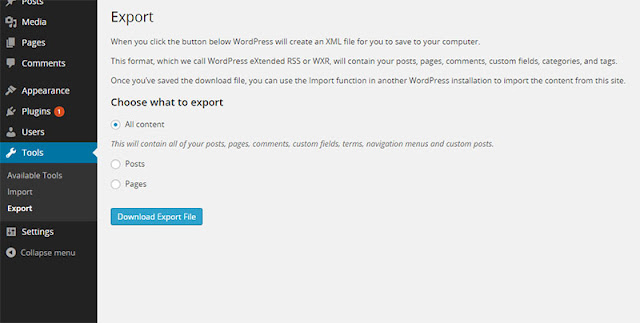
Step 1: Export Content Using Built-in WordPress Tools

The easiest way to move content is by using WordPress’s built-in export tool, assuming WordPress is already installed on your live server. In your local WordPress dashboard, navigate to Tools > Export and select the “All content” option. This generates an XML file containing your site’s content (posts, pages, media, and menus), which will download to your computer.

WordPress Export Tool

On the live server, log in to the WordPress dashboard, activate the theme used locally, and go to Tools > Import. If prompted, install and activate the WordPress Importer plugin. Then, upload the XML file you exported. This transfers posts, pages, media, and menus, though you may need to reassign menu locations and widgets manually.

WordPress Import Tool

Step 2: Move Database from Local Server to Live

For a complete site migration, including custom-built elements, transfer the database and files manually. This involves exporting the database, updating URLs, creating a new database on the live server, and uploading files.

1. Export Database File

Access your local server’s phpMyAdmin by navigating to http://localhost/phpmyadmin. Select your WordPress database from the left panel, click Export, and use the “Quick” export method. Click Go to download a `.sql` file (e.g., `my_test.sql`) to your computer.

phpMyAdmin Export

phpMyAdmin Export Quick Method

2. Modify File Paths

Local WordPress sites use absolute URLs starting with http://localhost/. These must be updated to the live server’s URL. Open the exported `.sql` file in a text editor (e.g., Notepad++) and perform a find-and-replace. For example, replace http://localhost/my_test with http://www.yourdomainname.com/my_test (or http://www.yourdomainname.com if installing at the root). Save the file without altering other content.

Find and Replace URLs

3. Create New Database on Your Hosting Account

Log in to your hosting account’s cPanel and navigate to MySQL Databases. Create a new database, user, and password, and link the user to the database. Note these credentials for the next steps.

cPanel MySQL Databases

4. Upload Database File to New Database

In cPanel, access phpMyAdmin, select the new database, and go to Import. Upload the modified `.sql` file. If phpMyAdmin is unavailable, use the Database Restore option in MySQL Databases to import the file.

phpMyAdmin Import

Database Restore Option

5. Update wp-config.php File

Open the wp-config.php file from your local WordPress installation in a text editor. Update the following lines with the new database credentials from Step 3:

define('DB_NAME', 'your_database_name');
define('DB_USER', 'your_database_user');
define('DB_PASSWORD', 'your_database_password');
define('DB_HOST', 'localhost');
    

Use the server IP address for DB_HOST if specified by your host; otherwise, keep it as localhost. Save a backup of the original file, then save and close the updated file.

6. Upload Website Files

Using an FTP client, connect to your hosting account with your FTP credentials (often the same as cPanel). Navigate to the public_html or www directory (or a subfolder if applicable) and upload all files from your local WordPress installation folder to this directory.
Log in to the live WordPress dashboard, go to Settings > Permalinks, and select the same permalink structure used on your local site. Save the settings to ensure proper link functionality.

Source: wpexplorer.com

If you encounter issues migrating your WordPress site from localhost to a live server, please comment below, and I’ll provide the best solution.

Related posts

4 Thoughts to “How to move your wordpress site from localhost to server?”

  1. vicky

    very helpful…:)

  2. Unknown

    it's saved my a lot of time..thanks for the article

  3. Anonymous

    thanks it helps me a lot

  4. Ben Kol

    OH NO! Don't do search/replace to your DB!
    From WordPress' documentation: "If you do a search and replace on your entire database to change the URLs, you can cause issues with data serialization, due to the fact that some themes and widgets store values with the length of your URL marked. When this changes, things break."
    https://codex.wordpress.org/Moving_WordPress

Comments are closed.